Solar roof mounting systems stop water from entering your home. They do this through smart design, quality flashing, and skilled installation. A single leak often starts at a poorly sealed hole, not at the panels. Most leaks come from poor workmanship, not from the solar panels themselves. A drilled hole without proper sealing always lets water in. A quality system from SIC SOLAR uses foam-backed seals and flashing to create a watertight barrier. With the right hardware and a trained installer, solar can actually shield your roof from rain and sun. You get clean energy and a drier attic space.
Key Takeaways
-
Most roof leaks come from poor installation, not the solar panels themselves.
-
Quality mounting systems use flashing and seals to create watertight barriers.
-
Proper flashing directs water away from roof penetrations to prevent leaks.
-
Prevent leaks by inspecting your roof and choosing quality hardware before installation.
-
Understand your warranty coverage to know who pays for leak repairs.
Common Causes of Roof Leaks Under Solar Panels
Workmanship vs. Mounting Methods
Most roof leak under solar panels problems start with poor workmanship, not the panels. Research shows that 80–90% of post-solar installation leaks stem from the same three causes: improperly flashed lag-bolt penetrations, sealant-only installs, or broken tiles never replaced during mounting. These are common causes of roof leaks under solar panels that you can avoid with careful planning.
Installers make several critical errors. They may skip flashing entirely and rely on sealant alone. They might drive lag bolts that miss the rafter and anchor only into plywood sheathing. On tile roofs, they sometimes crack tiles and re-lay them without replacement. Each mistake creates a path for water.
Penetration Points and Sealant Breakdown
Every home solar installation requires 20 to 40 individual roof penetrations. Each penetration becomes a potential leak point if improperly sealed. When sealant fails around bolts, water finds a direct path into your attic. In climates with extreme heat and driving winter rain, sealant degrades within 3 to 5 years. It cracks, shrinks, and pulls away from the shingle surface.
Improper drilling makes things worse. Installers may over-tighten or under-tighten lag bolts, splitting wood or shingles. They might drill directly through shingles without waterproofing layers. Some place flashing above shingles instead of weaving it under the course above. Others drill into valleys, ridge caps, or low points where water naturally pools. Bolts driven into seams between shingles break the water barrier entirely.
Quality mounting systems from SIC SOLAR use proper flashing and foam-backed seals to create watertight barriers. These systems mount panels above the roof to allow airflow and prevent moisture buildup. This design supports solar panel roof leak prevention by addressing the root causes before they start.
Roof penetrations for attachment points and fasteners need proper flashing and waterproofing to avoid becoming leak pathways. Improperly installed flashing can let water enter around mounting points even when the panel itself is functioning perfectly.
How Solar Roof Mounting Systems Prevent Leaks
Design of Solar Roof Mounting Systems
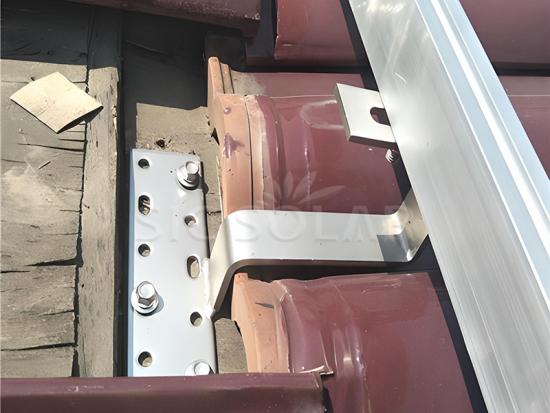
Engineers build solar roof mounting systems to create weatherproof seals that protect your roof surface. These systems address water intrusion at every attachment point. You can explore SIC SOLAR’s solar mounting systems for different roof structures. A well-designed system achieves solar roof mounting waterproofing through controlled and properly detailed roof penetrations. This approach reduces the risk of water ingress significantly.
Quality designs share several features. They use waterproof attachment methods because traditional roof penetrations may allow moisture intrusion when poorly sealed. Advanced systems support waterproof integration for stronger long-term protection. Integrated waterproofing attachment systems work directly with the roof's water-resistive barrier and flashing layers. They achieve waterproofing through the roof assembly detail rather than the mounting hardware itself. Proper flashing or waterproof sealing must be maintained during installation. Compatible materials and dependable fasteners with corrosion resistance and high pull-out strength complete the system.
SIC SOLAR demonstrates this commitment to quality. Their waterproof solar panel mounting system meets AS/NZS 1170 and JIS 8955:2011 standards. Each product carries a 10-year warranty and a 25-year lifetime. This ensures your roof stays protected for decades.
Proper mounting technique is your main defense against leaks. You do not need to avoid roof penetrations altogether. Any hole drilled for a mounting is filled by the bolt or screw, plus proper sealing. This ensures no water entry. The bolt itself becomes part of the water barrier when installed correctly.
The Role of Flashing and Seals
Flashing serves as the primary water barrier in any quality system. Metal flashing made from aluminum or stainless steel integrates under the upslope shingle course. For tiled roofs, suitable pitched roof tile hooks help connect the mounting rails to the roof structure. This placement lets water flow onto the flashing and back onto intact shingles. The upper flange tucks under the upslope shingle course. Water then sheds naturally down the roof.
|
Aspect |
Proper Flashing Practice |
Sealant-Only Shortcut |
|---|---|---|
|
Primary water barrier |
Metal flashing under shingle course |
Sealant or butyl tape alone |
|
Water-shedding order |
Upper flange tucked under upslope course |
Flashing above shingle course |
|
Minimum width |
At least 9-inch wide metal flashing |
Narrow flashing in wrong course |
|
Role of sealant |
Secondary protection only |
Primary long-term barrier |
|
Long-term durability |
Flashing floats with roof movement |
Sealant cracks as mounts flex |
The NRCA recommends treating every support as a pipe-style penetration with proper metal flashing. The Florida Roofing Association endorses metal flashing under the second or third shingle course. Industry groups caution that sealant-only solutions are not a long-term water barrier on PV mounts.
Follow these steps for proper flashing installation:
-
Insert the flashing plate beneath the upper shingle layer and position it over the lower shingle course.
-
Redirect water away from the mounting penetration before it reaches the roof deck.
-
Support the roof attachment above the waterproof layer.
-
Select aluminum for standard environments or stainless steel for coastal regions.
-
Use sealant only as secondary protection.
-
Verify the flashing sits flat and shingles are not distorted.
This approach prevents leaks before they start. Your roof and solar panels work together as one protected system.
Fixing a Solar Panel Leak
Step-by-Step Repair Process
You can fix most leaks with a careful, methodical approach. First, prioritize safety. Wear non-slip footwear, a safety harness, and gloves. Disconnect solar panel power to avoid electric shock. Never work in bad weather. If you need an urgent fix, apply waterproof tape or silicone sealant as a temporary measure.
Next, remove solar panels if the leak sits directly beneath them or the damaged area is inaccessible. Disconnect the system first and follow manufacturer instructions. Replace damaged shingles, soft roofing, or metal sheets so they fit snugly with the rest of the roof. Check solar panel attachment points and reapply sealant resistant to temperature changes and UV radiation. Troubleshoot valley or ridge problems using quality waterproofing materials. For serious damage, replace portions of roofing or update the waterproofing layer. Reinstall solar panels by fastening mounts securely, sealing properly, and aligning panels evenly. Finally, pour water over the roof to confirm no remaining leaks.
Confirming the Repair Scope
You must confirm the full repair scope to address every potential leak point. Trace the leak path from the interior damage back to its source on the roof. Inspect all roof penetrations, not just the obvious ones. Failed flashings do not always leak directly below their location. Remove affected panels to access the leak source when the leak is beneath the array.
Document all damage with photos and provide a written scope with itemized repair estimates. Determine whether panel removal is necessary. A flashing or sealant fix at the panel perimeter usually needs no removal. A targeted repair directly beneath panels may require removing several panels over the damage zone. A full reroof needs all panels removed.
Most solar panel roof leaks are preventable. Prevention starts before the first panel mount is drilled. Choose quality hardware from SIC SOLAR to protect your roof for decades.
Preventing Leaks Before Installing Solar Panels
Pre-Installation Checklist
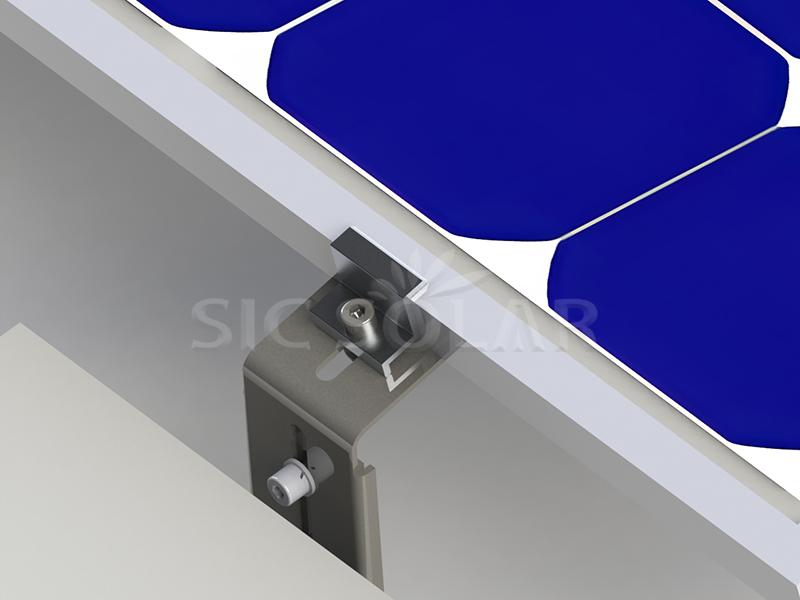
You can prevent most problems before anyone drills a single hole. Start with a thorough roof inspection. Look for cracked shingles, soft spots, or existing damage. Repair these issues first. Never install solar panels over an old roof beneath array that already shows wear.
Plan your layout carefully. Locate roof rafters and mark their centers with chalk lines. This step ensures mounts attach to structural members. Mark precise penetration points to minimize unnecessary holes. Gather essential tools before work begins. You need a pry bar for lifting shingles, a caulking gun, and high-quality roofing sealant rated for UV exposure. Complete flashing kits compatible with your racking system provide the primary water-shedding barrier. For some metal roofs, non-penetrating solar roof mounting systems may help avoid drilling into the roof surface. Appropriately sized lag bolts secure mounts without compromising structure. A stud finder locates rafters, and a drill with correctly sized bits creates clean holes.
|
Category |
Key Items |
Purpose |
|---|---|---|
|
Tools and materials |
Pry bar, caulking gun, UV-rated sealant, flashing kits, lag bolts, stud finder, drill |
Enable safe, precise installation |
|
Roof assessment |
Locate rafters, plan layout, inspect for damage, complete repairs |
Identify vulnerabilities before mounting |
These steps support solar panel roof leak prevention by addressing risks upfront.
Warranties and Quality Hardware
Choose mounting hardware, flashing, and sealants that meet recognized standards. Quality components create watertight barriers at every connection point. For flat roofs, a ballasted solar PV roof mounting system can hold panels without drilling into the roof. A properly installed system will not cause leaks. Any hole drilled for a mounting is filled by the bolt or screw, plus proper sealing. This simple principle protects your roof for years.
SIC SOLAR offers simple, durable, and economical solar roof mounting systems. These products save on labor costs while ensuring long-term reliability. The company's systems meet AS/NZS 1170 and JIS 8955:2011 standards. Each product carries a 10-year warranty and a 25-year lifetime.
Understand your warranty coverage before solar panel installation begins. Check whether your mounting system warranty covers structural defects. Confirm if roof penetration coverage includes leaks and related repairs. Workmanship coverage applies to installation-related defects, not equipment defects. You may need to contact two different providers for two different problems. Ask these questions early to avoid confusion later.
Who Is Responsible for Leaks Caused by Installers?
Installer Warranties and Insurance Claims
When an installer causes damage, you should check the installer's warranty and insurance coverage first. The contractor who installed your system typically holds liability for roof leaks. This is especially true when the leaks directly result from their installation practices.
Most installers do not offer roof leak warranties at all. Those that do average around 10 years of coverage. The average labor warranty sits at about 10 years as well. Warranty terms vary by installer. Some providers offer longer labor coverage, while others include roof leak protection for a limited period.
|
Installer |
Labor Warranty |
Roof Leak Coverage |
|---|---|---|
|
Installer A |
40 years |
10 years |
|
Installer B |
25 years |
Not specified |
|
Installer C |
10 years |
Yes |
|
Installer D |
10 years |
Yes |
|
Installer E |
10 years |
Yes |
"A roof leak warranty is sometimes included in the workmanship warranty, but many companies keep it separate because the length of coverage is different. Most companies don't offer a roof leak warranty at all, and those that do average around 10 years of coverage."
Roof leak warranties generally cover localized damage from water intrusion at the penetration site. They also cover water damage to building materials directly beneath the penetration. Common exclusions include total roof replacement, pre-existing leaks, third-party servicing, and extreme weather events. Repair costs for leaks and resulting water damage can range from $1,000 to $10,000. Interior or structural harm falls under your homeowners' insurance, not the installer's warranty.
Who to Call for Professional Help
You have two main options when seeking professional help. Contact a licensed roofing contractor repairs the leak underneath the solar array. Alternatively, call the original solar installer for inspections and repairs. A roofing contractor specializes in roof systems and can assess damage independently. The solar installer knows the mounting system and can check attachment points.
Gather documentation before you call. Take photos of leaks and write problem descriptions. Collect prior communications with your installer. Follow the provider's specific claims process carefully.
SIC SOLAR's customer-centric philosophy ensures support for their mounting systems. This commitment contributes to a sustainable future. Their waterproof solar panel mounting system and solar roof mounting waterproofing approach help prevent issues before they start. Proper solar panel roof leak prevention starts with quality hardware and trained installers.
Solar roof mounting systems reduce leak risk when you design, install, and maintain them correctly. Prevention beats repair every time. Vet your installer carefully and understand your warranty coverage before work begins. Ask about solar mounting waterproofing details and confirm the installer follows proper flashing practices. Schedule a professional inspection or consult a trusted solar contractor today. SIC SOLAR's waterproof solar panel mounting system protects your roof for decades. With quality hardware and skilled installation, solar panels become a safe, reliable investment. Your roof stays dry, and your energy stays clean. Proper solar panel waterproofing starts with quality hardware and trained professionals.
FAQ
Do solar panels cause roof leaks?
No. Poor workmanship causes most leaks, not the panels. Improper flashing, missing seals, or cracked tiles create water paths. A quality waterproof solar panel mounting system from SIC SOLAR uses foam-backed seals and proper flashing to keep water out.
How does solar roof mounting waterproofing work?
Engineers design mounting systems to create weatherproof seals at every attachment point. Metal flashing tucks under shingles and redirects water away. Any drilled hole gets filled by the bolt plus proper sealing. This approach delivers reliable solar panel roof leak prevention.
Can I fix a solar leak myself?
You can handle minor fixes with waterproof tape or sealant as a temporary measure. For lasting repairs, disconnect power first, then replace damaged flashing or shingles. Serious damage needs a licensed roofing contractor. Quality hardware prevents most issues before they start.
Who pays for leak repairs?
The installer typically holds liability when their work causes damage. Check their warranty and insurance coverage first. Most installers offer around 10 years of leak coverage. SIC SOLAR backs their mounting systems with a 10-year warranty and 25-year lifetime.